Navigation and routing are key aspects of designing an app as they determine how the user interacts with and accesses different features of the app. In Flutter, navigation refers to the process of moving between screens or pages in an app, while routing refers to the process of defining and managing routes for those screens. Flutter offers a powerful system for handling this.
In this article we will build a small app to help us explore navigation in Flutter. We will learn how to add multiple screens to an app using Navigator 2.0, and how to pass data between screens.
Prerequisites
Before we begin, make sure you have Flutter installed in your system. You can follow the steps from my previous post or go to the official Flutter website to install Flutter if you don’t.
Getting Started
To get started, let’s create a new Flutter project. I’m naming it navigation_app but feel free to name it what you like.


As usual, when creating a new Flutter project you should see some default code in the main.dart file in the lib folder. Remove everything except the following.
import 'package:flutter/material.dart';

void main() {
  runApp(const MyApp());
}

class MyApp extends StatelessWidget {
  const MyApp({super.key});
  @override
  Widget build(BuildContext context) {
    return MaterialApp(
      title: 'Flutter Demo',
      theme: ThemeData(
        colorScheme: ColorScheme.fromSeed(seedColor: Colors.deepPurple),
        useMaterial3: true,
      ),
    );
  }
}
We’ll start with two screens, HomeScreen() and SecondScreen(). Under the lib folder, add two files home_screen.dart and second_screen.dart.
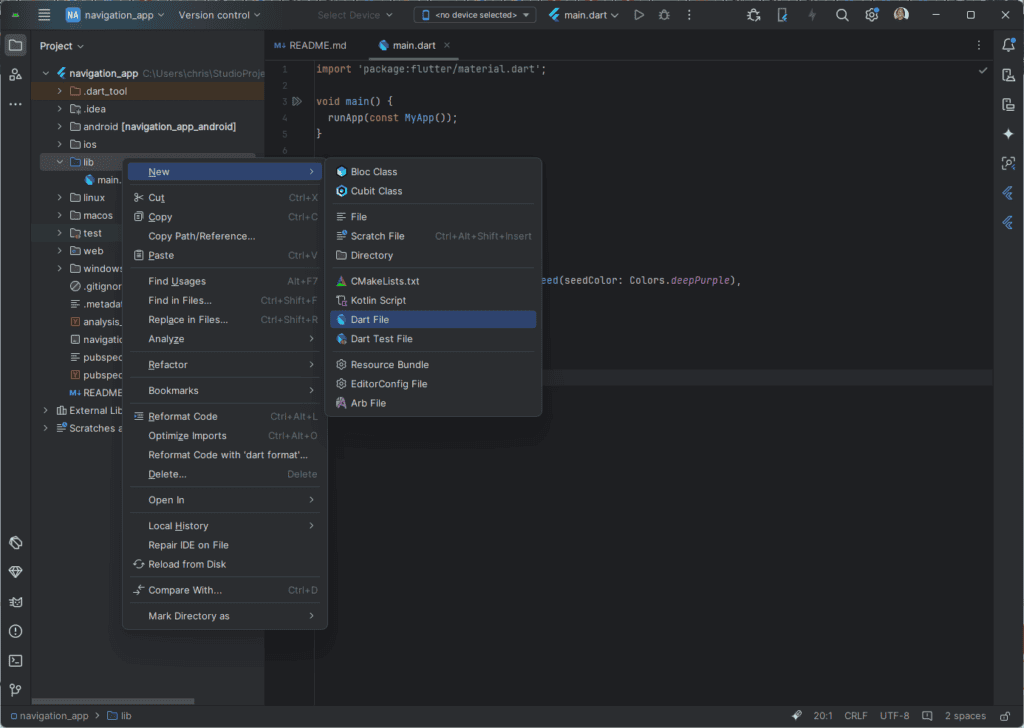
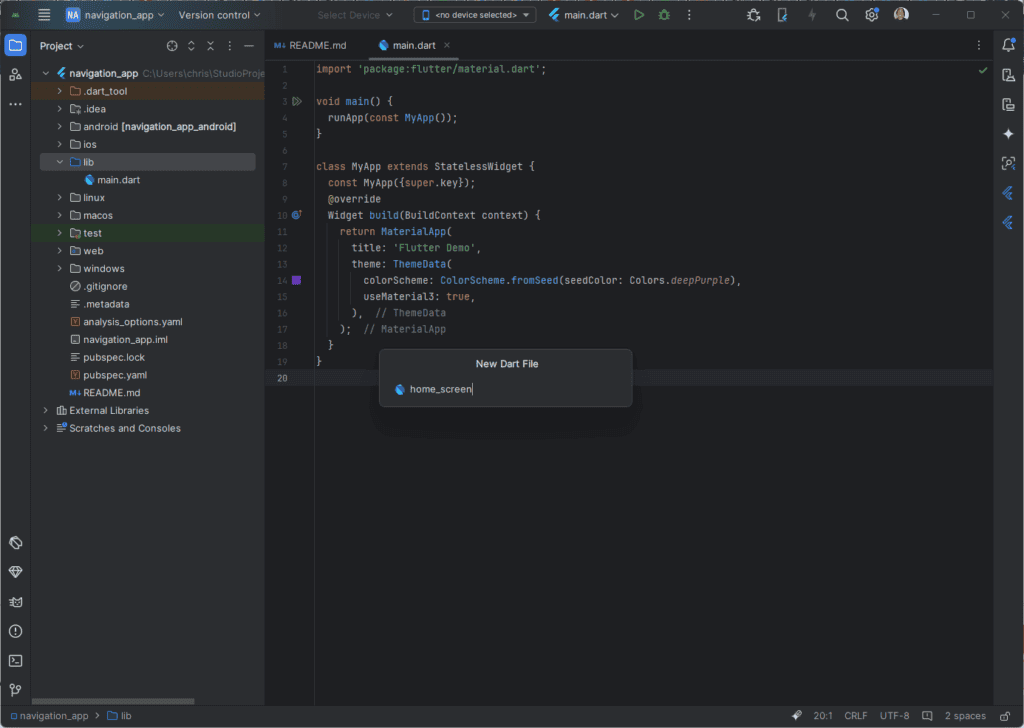

In the file second_screen.dart, let’s create the class SecondScreen and make it a stateless widget
import 'package:flutter/material.dart';

class SecondScreen extends StatelessWidget {
  const SecondScreen({super.key});

  @override
  Widget build(BuildContext context) {
    return Scaffold(
      appBar: AppBar(
        title: const Text('Second Screen'),
      ),
      body: const SafeArea(
        child: Center(
          child: Column(
            mainAxisAlignment: MainAxisAlignment.center,
            children: [
              Text('This is the second screen'),
            ],
          ),
        ),
      ),
    );
  }
}
Navigation
As stated previously, navigation is when we move from one screen to another in an app. According to the Google’s Material Design documentation there are three navigational directions: lateral navigation, forward navigation and reverse navigation. Let’s demonstrate these in our example app.
In the file home_screen.dart let’s create the HomeScreen class and make it a StateFulWidget
import 'package:flutter/material.dart';

class HomeScreen extends StatefulWidget {
  const HomeScreen({super.key});

  @override
  State<HomeScreen> createState() => _HomeScreenState();
}

class _HomeScreenState extends State<HomeScreen> {
  @override
  Widget build(BuildContext context) {
    return Scaffold(
      appBar: AppBar(
        title: const Text('Home Screen'),
      ),
      body: const SafeArea(
        child: Center(
          child: Column(
            mainAxisAlignment: MainAxisAlignment.center,
            children: [
              Text('This is the home screen'),
            ],
          ),
        ),
      ),
    );
  }
}
Now in main.dart and set the home property in MaterialApp to the HomeScreen widget we just created.
import 'package:flutter/material.dart';
import 'package:navigation_app/home_screen.dart';

void main() {
  runApp(const MyApp());
}

class MyApp extends StatelessWidget {
  const MyApp({super.key});
  @override
  Widget build(BuildContext context) {
    return MaterialApp(
      title: 'Flutter Demo',
      theme: ThemeData(
        colorScheme: ColorScheme.fromSeed(seedColor: Colors.deepPurple),
        useMaterial3: true,
      ),
      home: const HomeScreen(),
    );
  }
}
Running it in our emulator this is what it should look like

Lateral navigation
Lateral navigation is the movement between screens at the same level of hierarchy. The main navigation component of an app needs to provide access to all top level destinations. Lateral navigation can be implemented through a drawer, bottom navigation bar, or tabs.
Let’s add a bottom navigation bar to our home screen.
Scaffold(
      appBar: AppBar(
        title: const Text('Home Screen'),
      ),
      body: const SafeArea(
        child: Center(
          child: Column(
            mainAxisAlignment: MainAxisAlignment.center,
            children: [
              Text('This is the home screen'),
            ],
          ),
        ),
      ),
      bottomNavigationBar: BottomNavigationBar(
        items: const [
          BottomNavigationBarItem(icon: Icon(Icons.home), label: 'Home'),
          BottomNavigationBarItem(icon: Icon(Icons.person), label: 'Profile'),
          BottomNavigationBarItem(icon: Icon(Icons.chat), label: 'Chat')
        ],
      ),
    );
We set the bottomNavigationBar property of Scaffold to the BottomNavigationBar widget. The BottomNavigationBar widget has a required property called items, which we set to a list of BottomNavigationBarItem widgets. The BottomNavigationBarItem widget is used to display the label and icon of each item.
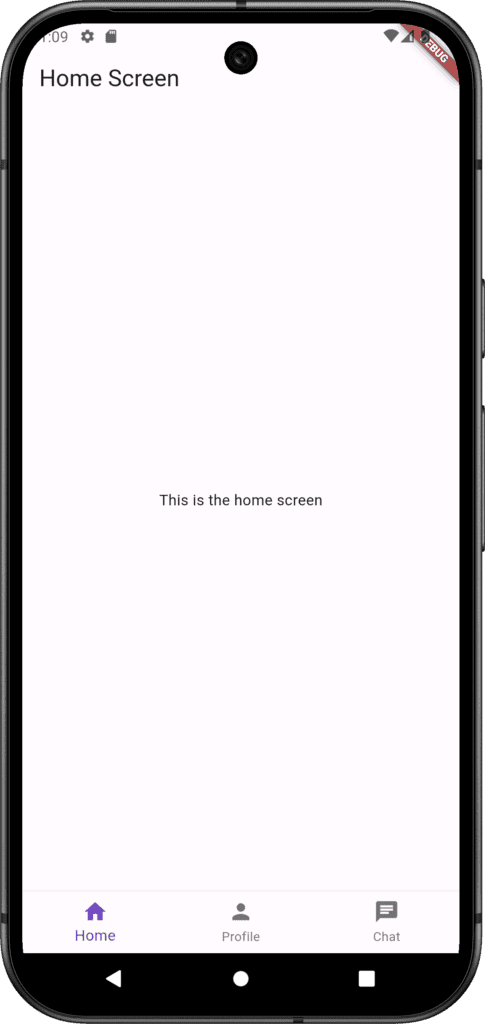
However the code above only displays the bottom navigation bar with the first item selected by default and doesn’t change anything when we click on any of items.
In order to display the selection of each item we will need to set the currentIndex property to a variable we create, and we will need to update it’s value in the onTap property.
int selectedIndex = 0; // New
@override
Widget build(BuildContext context) {
   return Scaffold(
     appBar: AppBar(
       title: const Text('Home Screen'),
     ),
     body: const SafeArea(
       child: Center(
         child: Column(
           mainAxisAlignment: MainAxisAlignment.center,
           children: [
             Text('This is the home screen'),
           ],
         ),
       ),
     ),
     bottomNavigationBar: BottomNavigationBar(
       items: const [
         BottomNavigationBarItem(icon: Icon(Icons.home), label: 'Home'),
         BottomNavigationBarItem(icon: Icon(Icons.person), label: 'Profile'),
         BottomNavigationBarItem(icon: Icon(Icons.chat), label: 'Chat')
       ],
       currentIndex: selectedIndex, // New
       onTap: (int index) {
          setState(() {
            selectedIndex = index; // New
          });
        },
     ),
   );
 }
You may have noticed that we update selectedIndex inside setState(). In a StatefulWidget, setState() notifies the framework that the state of this widget has changed.
We should now be able to see the selected item change to which ever one we clicked on.
To display the page of a selected item let’s create a list of three corresponding pages. Then display one page at a time base on selectedIndex by setting the body property to that page
int selectedIndex = 0;

  @override
  Widget build(BuildContext context) {
    // New
    List<Widget> pages = [
      SafeArea(
        child: Center(
          child: Column(
            mainAxisAlignment: MainAxisAlignment.center,
            children: [
              const Icon(Icons.home),
            ],
          ),
        ),
      ),
      const SafeArea(
        child: Center(
          child: Column(
            mainAxisAlignment: MainAxisAlignment.center,
            children: [
              Icon(Icons.person),
            ],
          ),
        ),
      ),
      const SafeArea(
        child: Center(
          child: Column(
            mainAxisAlignment: MainAxisAlignment.center,
            children: [
              Icon(Icons.chat),
            ],
          ),
        ),
      ),
    ];

    return Scaffold(
      appBar: AppBar(
        title: const Text('Home Screen'),
      ),
      body: pages[selectedIndex], // New
      bottomNavigationBar: BottomNavigationBar(
        items: const [
          BottomNavigationBarItem(icon: Icon(Icons.home), label: 'Home'),
          BottomNavigationBarItem(icon: Icon(Icons.person), label: 'Profile'),
          BottomNavigationBarItem(icon: Icon(Icons.chat), label: 'Chat')
        ],
        currentIndex: selectedIndex,
        onTap: (int index) {
          setState(() {
            selectedIndex = index;
          });
        },
      ),
    );
  }
Forward navigation
Forward navigation is another one of the navigational directions. It’s when you move between screens in one of the following ways:
- Downward in an app’s hierarchy, from parent screen to child screen
- Sequentially throw a flow
- Directly from one screen to any other in the app
Forward navigation embeds navigation behavior into containers, buttons, links, or by search.
Let’s add a button on the home (first) page of the bottom navigation bar and navigate to the SecondScreen widget we created earlier when the button is pressed.
In order to do this we will need to use Navigator.
Navigator is a widget for organizing the navigation stack (a stack of Route objects) and using the right transition animation for the target platform.
import 'package:flutter/material.dart';
import 'package:navigation_app/second_screen.dart';

class HomeScreen extends StatefulWidget {
  const HomeScreen({super.key});

  @override
  State<HomeScreen> createState() => _HomeScreenState();
}

class _HomeScreenState extends State<HomeScreen> {
  int selectedIndex = 0;

  @override
  Widget build(BuildContext context) {
    List<Widget> pages = [
      SafeArea(
        child: Center(
          child: Column(
            mainAxisAlignment: MainAxisAlignment.center,
            children: [
              const Icon(Icons.home),
              const SizedBox(height: 25), // New
              ElevatedButton( // New
                onPressed: () {
                  Navigator.push(
                    context,
                    MaterialPageRoute(
                      builder: (context) => const SecondScreen(),
                    ),
                  );
                },
                child: const Text('Go To Second Screen'),
              ),
            ],
          ),
        ),
      ),
      const SafeArea(
        child: Center(
          child: Column(
            mainAxisAlignment: MainAxisAlignment.center,
            children: [
              Icon(Icons.person),
            ],
          ),
        ),
      ),
      const SafeArea(
        child: Center(
          child: Column(
            mainAxisAlignment: MainAxisAlignment.center,
            children: [
              Icon(Icons.chat),
            ],
          ),
        ),
      ),
    ];
    return Scaffold(
      appBar: AppBar(
        title: const Text('Home Screen'),
      ),
      body: pages[selectedIndex],
      bottomNavigationBar: BottomNavigationBar(
        items: const [
          BottomNavigationBarItem(icon: Icon(Icons.home), label: 'Home'),
          BottomNavigationBarItem(icon: Icon(Icons.person), label: 'Profile'),
          BottomNavigationBarItem(icon: Icon(Icons.chat), label: 'Chat'),
        ],
        currentIndex: selectedIndex, // New
        onTap: (int index) {
          setState(() {
            selectedIndex = index; // New
          });
        },
      ),
    );
  }
}
With Navigator.push() we pushed SecondScreen into the navigation stack through MaterialPageRoute. MaterialPageRoute is a subclass of the Route class which specifies the transition animations for Material Design.
Reverse navigation
Reverse navigation is the backward movement between screens, which can happen chronologically through recent screen history, or upwards through the hierarchy of the app.
In the case of our app, reverse navigation is when we move from the second screen back to the home screen. In the last video you might have noticed that the second screen has back arrow in the app bar.
The AppBar widget has a property automaticallyImplyLeading that is set to true by default. However to demonstrate the implementation of reverse navigation we will set it to false and set the propery leading to our own back button and use Navigator.pop() to go back to the home screen
import 'package:flutter/material.dart';

class SecondScreen extends StatelessWidget {
  const SecondScreen({super.key});

  @override
  Widget build(BuildContext context) {
    return Scaffold(
      appBar: AppBar(
        title: const Text('Second Screen'),
        automaticallyImplyLeading: false,
        leading: IconButton(
          icon: const Icon(Icons.arrow_back),
          onPressed: () {
            Navigator.pop(context);
          },
        ),
      ),
      body: const SafeArea(
        child: Center(
          child: Column(
            mainAxisAlignment: MainAxisAlignment.center,
            children: [
              Text('This is the second screen'),
            ],
          ),
        ),
      ),
    );
  }
}
Passing data between screens
Passing data between screens when navigating between them might be something that is needed. Let’s implement this in our example app.
Send data to a new screen
In a new file third_screen.dart let’s create the widget ThirdScreen to which we will be passing the variables name and age to display.
import 'package:flutter/material.dart';

class ThirdScreen extends StatelessWidget {
  const ThirdScreen({
    required this.name,
    required this.age,
    super.key,
  });
  final String name;
  final String age;

  @override
  Widget build(BuildContext context) {
    return Scaffold(
      appBar: AppBar(
        title: const Text('Third Screen'),
      ),
      body: SafeArea(
        child: Center(
          child: Column(
            mainAxisAlignment: MainAxisAlignment.center,
            children: [
              Text('name: $name'),
              const SizedBox(height: 25),
              Text('age: $age'),
            ],
          ),
        ),
      ),
    );
  }
}
In the page for the profile bottom navigation bar item, let’s add two text fields and a button to submit the input from those fields and display it on the third screen we created
class _HomeScreenState extends State<HomeScreen> {
  int selectedIndex = 0;
  final nameController = TextEditingController(); // New
  final ageController = TextEditingController(); // New

  @override
  Widget build(BuildContext context) {
    List<Widget> pages = [
      ...
      SafeArea(
        child: Center(
          child: Column(
            mainAxisAlignment: MainAxisAlignment.center,
            children: [
              const Icon(Icons.person),
              const SizedBox(height: 50),
              // New
              Padding(
                padding: const EdgeInsets.all(25.0),
                child: TextField(
                  controller: nameController,
                  decoration: const InputDecoration(hintText: 'Name'),
                ),
              ),
              // New
              Padding(
                padding: const EdgeInsets.all(25.0),
                child: TextField(
                  controller: ageController,
                  decoration: const InputDecoration(hintText: 'Age'),
                ),
              ), // New
              const SizedBox(height: 75), // New
              ElevatedButton(
                child: const Text('Submit'),
                onPressed: () async {
                  await Navigator.push(
                    context,
                    MaterialPageRoute(
                      builder: (context) => ThirdScreen(
                        name: nameController.text,
                        age: ageController.text,
                      ),
                    ),
                  );
                  nameController.text = '';
                  ageController.text = '';
                },
              )
            ],
          ),
        ),
      ),
      ...
    ];
    return Scaffold(
      appBar: AppBar(
        title: const Text('Home Screen'),
      ),
      body: pages[selectedIndex],
      bottomNavigationBar: BottomNavigationBar(
        items: const [
          BottomNavigationBarItem(icon: Icon(Icons.home), label: 'Home'),
          BottomNavigationBarItem(icon: Icon(Icons.person), label: 'Profile'),
          BottomNavigationBarItem(icon: Icon(Icons.chat), label: 'Chat'),
        ],
        currentIndex: selectedIndex, // New
        onTap: (int index) {
          setState(() {
            selectedIndex = index; // New
          });
        },
      ),
    );
  }
}
Return data from a screen
To return data from a screen we can pass the data to Navigator.pop() when we press the back arrow on the app bar.
when the back button is pressed, if the name and age passed were not empty then we want to pass ‘yes’ to Navigator.pop(), else we pass ‘no’.
import 'package:flutter/material.dart';

class ThirdScreen extends StatelessWidget {
  const ThirdScreen({
    required this.name,
    required this.age,
    super.key,
  });
  final String name;
  final String age;

  @override
  Widget build(BuildContext context) {
    return Scaffold(
      appBar: AppBar(
        title: const Text('Third Screen'),
        automaticallyImplyLeading: false, // New
        // New
        leading: IconButton(
          icon: const Icon(Icons.arrow_back),
          onPressed: () {
            String data = 'No'; // New
            // New
            if (name.isNotEmpty && age.isNotEmpty) {
              data = 'Yes';
            }
            Navigator.pop(context, data);
          },
        ),
      ),
      body: SafeArea(
        child: Center(
          child: Column(
            mainAxisAlignment: MainAxisAlignment.center,
            children: [
              Text('name: $name'),
              const SizedBox(height: 25),
              Text('age: $age'),
            ],
          ),
        ),
      ),
    );
  }
}
In the profile page we will receive the data we returned. We do this by awaiting the result of the call we made to Navigator.push(), saving it into a variable and display it in a snackbar.
SafeArea(
  child: Center(
    child: Column(
      mainAxisAlignment: MainAxisAlignment.center,
      children: [
        const Icon(Icons.person),
        const SizedBox(height: 50),

        Padding(
          padding: const EdgeInsets.all(25.0),
          child: TextField(
            controller: nameController,
            decoration: const InputDecoration(hintText: 'Name'),
          ),
        ),

        Padding(
          padding: const EdgeInsets.all(25.0),
          child: TextField(
            controller: ageController,
            decoration: const InputDecoration(hintText: 'Age'),
          ),
        ),
        const SizedBox(height: 75),
        ElevatedButton(
          child: const Text('Submit'),
          onPressed: () async {
            final result = await Navigator.push(
              context,
              MaterialPageRoute(
                builder: (context) => ThirdScreen(
                  name: nameController.text,
                  age: ageController.text,
                ),
              ),
             );
             nameController.text = '';
             ageController.text = '';
             // New
             ScaffoldMessenger.of(context)
               ..removeCurrentSnackBar()
               ..showSnackBar(SnackBar(content: Text('Is not empty: $result')));
           },
         ),
       ],
     ),
   ),
 ),
Conclusion
Navigation and routing are crucial for creating apps with seamless user experience.
In this blog post we took an introductory look at navigation and routing in Flutter. We have learned to add multiple screens to an app using Navigator 2.0, and to pass data between screens.
Feel free to leave any comment or question you have in the comment section, or reach out to me in the contact section. I would definitely appreciate any feedback you may have!


